

How Far Down Can Drill A Golf Cart Battery To Repair A Post
Battery cables and their connections to the battery terminals tin go bad. A mutual scenario is one in which the cart starts to wiggle when trying to take off, or stops altogether, or even just smells hot. Then, you lift up the seat and y'all come across the end of i of the battery cables looks "cooked". Several things could accept acquired this to happen. Probably the most mutual thing is that the connector on the battery wasn't tightened properly. You've got to call up that when yous tighten the nut that holds the bombardment cable end (I'll refer to this as the connector) to the battery (I'll call this the terminal), you are counting on the nut pressing the connector tightly down onto something that is made out of pb. Pb is kind of a "spongy" material and needs some special consideration when information technology comes to connecting electrically to information technology. It tends to "flatten out" any loftier or crude spots in the terminal, subsequently the pressure of the nut is practical. Then, what seems like a expert solid connection when the nut is first practical, tin can become a loose connection after the pressure of the nut has had time to press high or fifty-fifty just crude spots into the pb. After tightening the nuts downwardly, the connectedness should be given some fourth dimension (similar a twenty-four hours or so) to settle things out and and then the nuts should be retightened. You can go alee and drive the cart, merely later on about 24 hours or so, lift the seat and retighten the nuts on the batteries again. How tight should the nuts be tightened downwards? Most battery manufacturers recommend that the nuts be tightened to about 110 inch-lbs. That comes out to about 9 ft.-lbs. Most people are not going to use a torque wrench every time they tighten the battery nuts down, only if you have a torque wrench, it is a good thought to apply it on the nuts at least one fourth dimension (prepare to 9 ft-lbs.) and simply get the "feel" for how tight that is.
Some other common reason that a connection to the final will go bad is due to the build-up of corrosion in the connection/terminal area. Unfortunately, corrosion is a "mode of life" in dealing with pb acid batteries. The batteries need to be washed off periodically to minimize its furnishings. What can too happen with corrosion, is that it takes place support under the rubber jacket of the battery cable to where y'all can't see information technology. Information technology somewhen destroys strand after strand until the remaining wire isn't sufficient to deport the current needed to operate the cart. This introduces resistance to the electric current flow, and wherever in that location is RESISTANCE there is HEAT.
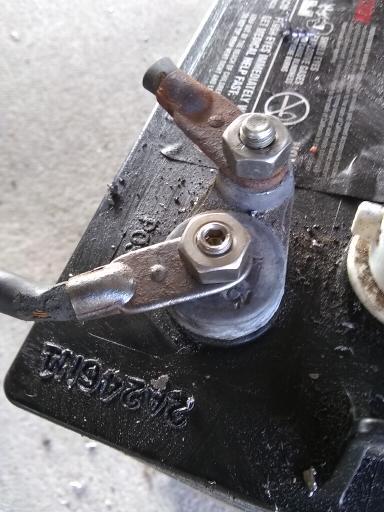
No matter what caused information technology, when you take an issue with i of the connection/terminals or cable problems, the area where the problem is, generally gets so hot that it amercement the lead connector, and usually "welds" the nut to the terminal. It tin can also melt the lead down to where the last is no longer usable in its present form. When y'all endeavor to get the nut off of the concluding, it will either break off or only spin in the lead. BUMMER. So, at that place you are, with a cable stop stuck on the terminal, but you can't tighten it or get it off.
Fortunately, there is commonly a "fix" for the whole mess. Instead of replacing the cable and the battery, the terminal can generally be "repaired".
When y'all await at the battery terminal associates, it consists of a round pad where its connection to the internal plate of the battery is, and then at that place is a "tab" that comes out of the pad that provides a identify for the final (bolt) to stick up. The terminal is actually a commodities that is sticking upwards, with its caput molded into the lead below. And that's the trouble. In one case the bolt "spins" in the pb from trying to turn it with the nut welded to it, it's all over for that part of the terminal. Withal, what you can do is to go into the pad next to the terminal and "create" a new one.
The first thing nosotros need to do is to go the one-time battery connector out of the circuit. I simply cut it off of the end of the battery cable and in one case the remainder of the repair has been made, replace it with a new i. There is no demand to remove the old ane from the bombardment. Just let information technology hang at that place. It won't hurt a thing, once it is asunder from the battery cable. If you don't have a crimping tool to install the new connector, it might be easier to just disconnect the cablevision at its other end and replace the whole cable. Then we'll drill a new pigsty in the pad and tap it to fit a new "bolt" in the form of a 5/16 past 18 thread per inch stainless- steel socket set up screw. Information technology's quite of import that y'all use a stainless-steel socket fix screw. You can do the chore with another type, just it will quickly corrode. I've seen every kind of a screw that you can imagine being used to simply spiral the new connector to the pad without borer the pad, but they just don't work good AT ALL (in my opinion). They usually loosen up later on a while and create further issues. With the method nosotros are using, the new one will be just as skilful equally the original and last the life of the battery. I've been using this technique to replace terminals for well over 12 years, and I've never had one get bad unless there was some unusual circumstance (like someone didn't tighten the nut down correctly on the new final).
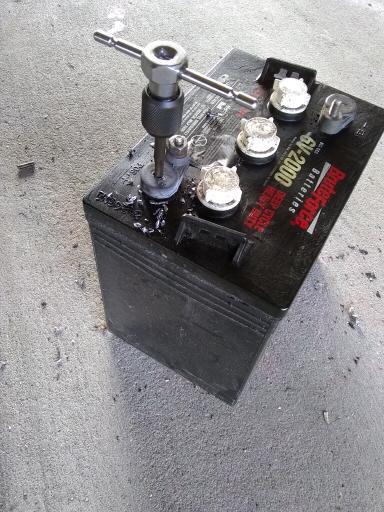
So, one time the old connector has been cut off of the final, it's time to drill the pad so that it will accept the new terminal. This footstep is very of import. The hole we drill needs to be merely the right size and that ends up being a letter "F" lettered drill. Information technology is 0.257 inch in diameter and is merely correct for the 5/sixteen inch stainless-steel socket gear up screw that nosotros will use every bit our new concluding. I've tried using a slightly smaller and a slightly larger flake (just because they were more readily bachelor), simply it doesn't work worth a darn. The last merely doesn't fit the pigsty correctly. Drilling in lead is kind of tricky because the chip tends to "stick" in the soft lead. I discover it best to merely drill a small altitude, back the bit out, clean the lead from the flutes of the bit, and go again. It may accept four or 5 passes to complete the job. Drill the new pigsty well-nigh ¾ of an inch deep.
Then the next step is to tap the hole you just drilled with a 5/16 inch diameter past 18 thread per inch tap. Tapping in pb is just as tricky every bit drilling in it and requires some patience also. Merely twist the tap a couple of turns (or less) at a time. After each time, finish and make clean pb out of the flutes of the tap, and and so get a little flake further and repeat the process, until y'all have reached the lesser of the hole. Yous volition know when you've reached the bottom, equally it will go impossible to tap any farther, without breaking something. The drill leaves a rounded lesser to the hole, so the tap won't go "completely" to the bottom of the pigsty, merely once you spiral the new concluding in as far as it volition go, information technology will exit enough of the new terminal sticking out above the hole to accommodate the new connector and its new nut. The post-obit are pictures of what the procedure looks like:
The next thing to do is to put virtually 3 drops of a thread locking amanuensis into the bottom of the pigsty. I use the "Cherry-red" or "Blue" version of the "Loctite" production, but any good thread locking product will piece of work just fine.
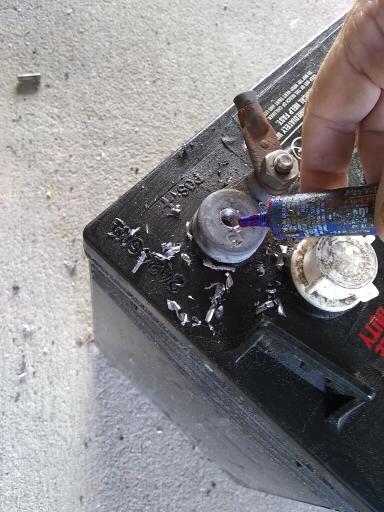
The side by side step is to use a hex (Allen) wrench to screw the socket set up spiral into the hole. Then it'southward just a matter of replacing the connector on the stop of the cablevision (or replacing the whole cablevision) and you are done. In many cases, it is possible to do the whole process without removing the battery from the cart, only in some cases, you but don't take enough room to work, so you have to take the battery out.
Doing the repair in this fashion, gives you a new terminal that is screwed into the pad in a very secure way, and through the years, I have only had one, odd ball battery that wouldn't let me tighten the socket set screw downwards. Information technology would strip out. It was equally if the lead was somewhat "chalky". I guess that information technology had to practise with the type or condition of the lead that was used in the manufacture of the battery. However, that was ane out of dozens that I have done, and the residue have all been successful. Think, that you must be able to observe a stainless-steel, one inch long socket gear up screw and an "F" lettered drill chip to do the job. We have a local Ace Hardware store that carries lettered bits, so, at least where I live, that role is easy. Our local Abode Depot carries stainless-steel socket set up screws (about of the fourth dimension) so, that is easy likewise. If yous can't find the stainless-steel socket screw, there are may places on the internet that have them bachelor. Good Luck, Ron.
Ron Staley has published the post-obit books, and you tin get more information most them by just clicking on each title below:
Electrical Golf Cart Repair 101 (and a half)
Techniques, Tips, Tools and Tales
Gas Golf Cart Repair 101 (and a half)
Techniques, Tips, Tools and Tales
Suck, Squish, Boom and Blow
4-Stroke Golf Cart Engines Explored
Those Darned Slot Machines
What Makes Them Tick
By an one-time Slot Machine Mechanic

Source: https://www.golfcartstuffhodgepodge.com/i-cant-get-my-battery-cable-off/
Posted by: wyantforray.blogspot.com
0 Response to "How Far Down Can Drill A Golf Cart Battery To Repair A Post"
Post a Comment